Pinterest

Tuesday, January 29, 2013

Blueberry pancakes

Pacakes are yummy: too-good-and-too-caloric! In Australia, they are pretty confused between the words "crepes" and "pacankes". The difference is that the pacakes are thicker and smaller than the crepes. The taste pretty much the same, exepted that crepes are lighter so you can eat more of them!

I didn't want to bother you with a basic pancakes recipe so i picked a blueberry one. You can also find very good chocolate or honey one.


Ingredients
  • 1&1/2 cup of all purpose flour
  • 1/4 cup of caster sugar
  • 1 tablespoon of baking powder
  • 1 pinch of salt
  • 3/4 cup of milk (plus extra for later)
  • 1 egg
  • 1 tablespoon of oil + extra to cook
  • 1/2 cup of fresh blueberry
  • Maple sirup
  • Butter

Methode
  1. Whisk together first four ingredients; make a hole in the center.
  2. In a separate bowl, whisk together milk, egg, and oil; add to dry ingredients, stirring just until moistened. Gently, pour the blueberries in.
  3. Pour about 1/4 cup batter for each pancake onto a hot, lightly greased pan.
  4. Cook pancakes until tops are covered with bubbles and edges look cooked, turn and cook other side. Serve with maple syrup.

Enjoy!
Xx

Friday, January 25, 2013

Mini chocolate trifle

Hello! After this little break, I'm coming back with an individual, cold and easy to make desert.

But first, I was very busy last week because we were doing renovations in the new flat, and cooking in the dust isn't the best! And, I can now show you a part of our new kitchen which soon, will be in the DIY section.

I wanted to make this desert after i tried to make a chocolate cake in a can. It's supposed to be a high cake that you can decorate very prettily:) But with me it overflowed everywhere and was stuck in the can... A disaster! But i kept the chocolate cake who was ugly but delicious.

The good thing with this chocolate trifle it's that you can make it ahead and stock it in the fridge. You can also make the chocolate cake ahead and freez it. Just don't forget to defrost it few hours before you start making this.


Ingredients
  • 1 chocolate cake
  • 110g of chocolat
  • 1 heavy cream pot
  • 1 small greek yogurt pot
  • 10 cl of milk

Methode
  1. Crumble the entire chocolate cake and place it in the bottom of each glass. Melt 90g of chocolate and mix it with the milk.
  2. Pour that into the glass. Mix chocolate cake's crumbs with half of the cream and jalf of the yogurt until light and smooth. Pour in the jar.
  3. Combine remaining cream and yogurt together  and add to the glass. Then repeat layers from the begining all the way to the top.
  4. When you reach the top, with a vegetable piller, grate the left over chocolate and set as decoration. Store it in the fridge.


Enjoy!
Xx

Wednesday, January 16, 2013

Baked Sandwiches

Hummm... It's coming on theblogosphere, very quick and easy to make, everyone have the stuff at home: it's the sandwiches baked!
You can fill it with any ingredients. Today bacon and cheese, tomorrow proscuitto and parmesan or tuna & pickles.


Ingredients
  • 6 to 8 slices of white bread
  • 20 cl of milk
  • A pinch of salt & pepper
  • 6 slices of bacon
  • 4 slices of cheese (your favorite)
  • 3 eggs


Methode
  1. Preheat the oven 180°
  2. In a mixing bowl mix well the eggs, the milk, salt & pepper.
  3. Cook the bacon in a pan.
  4. Place the white bread slices on the bottom of the cake pan and ensure that you are covering the whole bottom. It's possible at this step to spread cream cheese on the bread slices.
  5. Add the bacon cut on pieces and the slices of cheese. Pour a part of the mixture on it and keep adding bread, bacon, cheese... All the way to the top!
  6. Pour the most part of the mixture on the top of the last slices of bread.
  7. Bake for 35 minutes.

Enjoy!
Xx

Sunday, January 13, 2013

Duck breast & roast mango

I tried this recipe the first time around Christmas. It's hard to fin duck in Australia, but after 5 butcher shhops I found some. Too happy! Here is a very good time for mangoes, they are delicious almost all over the year. A delicious duck breast, perfectly cook and roast mangoes slices is easy and delicious. It is also really impressive if you are having guests. The caramelised soucause made of balsamic vinegar, honey and white wine is soo good!


 Ingrédients
  • 2 beaux magrets de canards
  • 2 mangues
  • 2 à 3 cuillerées à soupe de vinaigre balsamic
  • 2 cuillères à café de miel
  • 30 ml de vin blanc
  • sel, poivre


Mettre les magrets côté peau dans un poêle bien chaude. Laisser cuire pour obtenir une belle peau bien dorée. Les retourner pour les faire cuire 2 minutes côté chair. Le canard va ainsi cuire parfaitement.
Garder le gras de la poêle !!!!
Placer les magrets de canard dans un plat qui va au four et placer les dans un four (pas trop chaud) pour les maintenir à bonne température.


Tenir votre mangue droite, le dessus du noyau pointant vers le haut et couper à environs un centimètre du milieu une tranche. Faire la même opération pour l'autre côté et répéter pour la deuxième mangue. Ou vous pouvez visionner cette vidéo qui explique bien mieux que moi !
Mettre les tranches de mangues à cuire sur feu assez fort dans la poêle qui a servi au magrets, avec leur graisse. Les saler et les poivrer. Quand les mangues commencent à dorer, les retourner pour cuire l'autre face. Quand elles sont cuites, placer les mangues dans l'assiette.


Toujours dans la même poêle, que vous n'aurez pas lavé, ajouter le vinaigre balsamic, le miel et le vin. Laisser cuire deux à trois minutes. Pendant ce temps sortir les magrets du four et les couper en tranches. Placer les dans l'assiette avec les mangues et verser la sauce par dessus. Servir immédiatement !


Friday, January 11, 2013

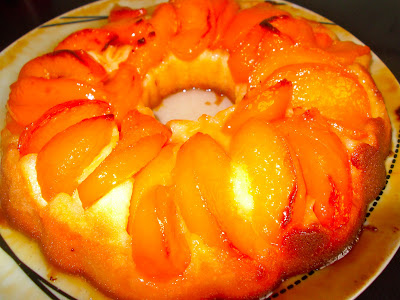
Peach cake tatin

This cake is just beautifull. Fresh, summer, it's what we needed with the 38° of today. Be carreful, the caramel is realy tricky! If it's winter for you, you could use peaches in a can, the taste will not be too altered because it mainly comes from the caramel. The smell was only a precursor to how fabulous this cake actually was.  It was absolutely out of this world!  As the cake cooled, the caramel flavor seeped into the cake, leaving it not mushy but just delicious.  The sweetness of the peaches exploded and the now caramel-y cake was dense and perfect.  I can’t say enough good things here (obviously) but I have to say that it is must to serve a scoop of softened vanilla ice cream alongside…the ice cream takes the cake to level sublime!


Ingrédients
  • 85gbutter
  • 2 à 3 large peaches
  • 370g sugar
  • 2 large eggs
  • 80ml creme fraiche
  • 1 spoon of lemon juice
  • Few drops of vanilla extract
  • 135g flour
  • 1/2 spoon baking powder
  • 1 pinch of salt

Methode
  1. Preheat the oven to 350 degrees F. Generously butter a 9-inch glass pie dish and arrange the peaches in the dish.
  2. Combine 1 cup of the granulated sugar and 1/3 cup water in a small saucepan and cook over high heat until it turns a warm amber color. Swirl the pan but don’t stir. Pour evenly over the peaches.
  3. Meanwhile, cream the 6 tablespoons of butter and the remaining 3/4 cup of granulated sugar in the bowl of an electric mixer fitted with the paddle attachment, until light and fluffy. Lower the speed and beat in the eggs one at a time. Add the sour cream, zest, and vanilla and mix until combined. Sift together the flour, baking powder, and salt and, with the mixer on low speed, add it to the butter mixture. Mix only until combined.
  4. Pour the cake batter evenly over the peaches and bake for 30 minutes, until a cake tester comes out clean. Cool for 15 minutes, then invert the cake onto a flat plate. If a peach sticks, ease it out and replace it in the design on top of the cake. Serve warm or at room temperature.


Enjoy!
Xx

Saturday, January 5, 2013

Gâteau fraises et chocolat

 Le 24 décembre au soir on c'est dit que tout ce qu'on avait déjà prévu pour le lendemain ne serai pas assez qu'elle idée  alors on a décidé de faire un gâteau !


C'est un gâteau au chocolat qui a été coupé en deux, fourré à la crème et aux fraises et recouvert de nappage chocolat... Autant vous dire que même après le déjeuner de Noël qu'on venait de terminer on a réussi à engloutir cette merveille !

Ingrédients

Pour le gâteau au chocolat
  • 200g de chocolat patissier
  • 150g de beurre
  • 150g de sucre
  • 50g de farine


Pour la crème
  • 5 à 6 cuillères à soupe de crème fraiche
  • 3 à 4 cuillères à soupe de yaourt nature
  • 1 cuillère à soupe de sucre

Pour le nappage
  • 150g de chocolat
  • 1 à 2 cuillères à soupe de crème fraiche


Pour le gâteau au chocolat

Préchauffer le four à 180°
Faire fondre le beurre et le chocolat dans une casserole à feux doux.
Dans un saladier mélanger le sucre et les œufs jusqu'à ce que ce soit bien blanc. Ajouter doucement la farine sans faire de grumeaux. Mélanger à cette préparation le mélange beurre et chocolat.
Chemiser le moule et cuire le gâteau pendant 20 minutes.


Pour la crème

 Mélanger le sucre, la crème et le yaourt jusqu'à ce que le sucre soit totalement incorporé.
Couper le gâteau en deux, aidez vous d'ustensiles plats pour déplacer la partie du dessus. Étaler la crème sur la partie du bas, disposer des rondelles de fraises et remettre la partie du dessus en place.


Pour le nappage 

 Dans une casserole, faire fondre le chocolat et ajouter la crème quand il a fondu. N'en ajoutez pas trop, on ne veux pas un mélange liquide. Si vous avez mis trop de crème, pas de panique, stockez le nappage au frigo pour le rendre plus ferme.
À l'aide d'une spatule étaler le nappage sur le dessus du gâteau et décorer avec des fraises !


Conserver le gâteau au frais est impératif ! Régalez-vous !

Friday, January 4, 2013

Le Brookie

Cette recette a fait le tour de la blogosphère culinaire et ça fait maintenant un moment que je voulais le tester. Elle a été présenté en premier chez Martha Stewart, je l'ai aussi vu ici, ici et .


Le Brookie comme son nom l'indique, c'est un mélange de brownie et cookie.

Les cookies, je suis pas experte, ils ont tendance à s'étaler pour former une plaque ou je les oublie juste un peu dans le four. Pour une fois, le cookie est très bon. Dans ce brownie, on peu y ajouter des noix, mais je déconseille car le gâteau est déjà très riche.

Je l'ai testé chaud en sortant du four, froid sortant du frigo ou à température ambiante, c'est toujours bon ! Même si j'ai un penchant pour les gâteau un peu tièdes.


Ingrédients
Pour le Brownie
  • 90g de farine
  • 2 oeufs
  • 120g de sucre
  • 65g de beurre
  • 150g de chocolat
  • 1 pincée de sel

Pour le Cookie
  • 50g de vergeoise brune
  • 45g de sucre
  • 1 oeuf
  • 100g de beurre
  • 180g de farine
  • 80g de chocolat haché en pépites en petits dès / pépites de chocolat
  • 1 pincée de sel


Partie Brownie 

Dans une casserole, faire fondre le beurre et le chocolat à feux très doux en remuant régulièrement.
Retirer du feux, ajouter dans l'ordre le sucre, les œufs, la farine puis une pincée de sel. (c'est le moment où vous pouvez ajouter des noix).
Bien mélanger et verser le tout dans un moule graisser et chemisé.


Partie Cookie

Faire fondre le beurre puis le verser dans un saladier avec le sucre et le sel puis fouetter jusqu'à obtenir un mélange homogène, voir mousseux.
Ajoutez ensuite l'oeuf puis la farine.
Concasser le chocolat en pépites ou utiliser les pépites de chocolat et les mélanger à la préparation..

Disposer des petits tas de pâte à cookie sur la pâte à brownie (la pâte à cookie ne peut pas être étalée, elle s'enfoncerait dans la pâte à brownie, il suffit de disposer des petits tas assez rapprochés, la pâte s'étendra en cuisant et recouvrira toute la surface)
 
Cuire à 180° pendant une 30 minutes puis couper le four et y laisser le brookie pour 1h de plus.
Démouler lorsque le gâteau est froid.


Bon appétit !