Pinterest

Thursday, November 14, 2013

Cherry, Almond and Nutella Cake

Today, I simply felt like baking. I opened my pantry, found a jar of cherry, almond powder and Nutella and decided to challenge myself with a cake! I used a basic yogurt cake recipe and added my three ingredients. I came out really fine.


Ingredients
  • 1 cup greek yogurt
  • 1 1/2 cup raw sugar
  • 2 cup self raising flour
  • 2 eggs
  • 1/2 cup oil (vegetable/canola)
  • 1 tbs vanilla extract
  • 1 cup cherries
  • 1 cup almonds
  • 3 to 4 tbs Nutella


Preheat oven to 180°C. Grease a 20cm square cake pan with the butter and flour.

Use electric beaters to beat eggs and sugar in a bowl until pale and creamy. Add yoghurt, almond powder and oil, beat until combined. Gently fold in the sifted flour with a large spoon until combined. Spoon the mixture into the prepared cake pan and smooth the surface.
Nicely place the cherries on top and spread the Nutella over it.

Bake in pre- heated oven for 25 minutes or until a skewer inserted into the centre comes out dean. Remove from oven and place cake pan on a wire rack.

Cut slices and serve warm or cold.


Enjoy!
Xx

Monday, November 11, 2013

King Cake / Galette des Rois

This cake refers to a really old french tradition. It is a bit after christmas, the cake is brought to the table and the youngest person goes under the table. The one serving the cake picks a slice and asks "Who's that one for?" the youngest one chooses a name and it goes on until everyone has a slice. Then the persone that find the 'fève' (bean) will become king, get a paper crown and choose a queen.

It's a puff pastrie and almond cream cake and you can hide any bean that you like in it. The please is the hunt! Here is a pretty good tutorial on how to make one.

Kids absolutely love this tradition!


Ingredients
  • 2 sheets of puff pastry
  • 1 cup almond powder
  • 1 cup sugar
  • 75g butter at room temperature
  • 1 tbs plain flour
  • 2 eggs
  • 1 tbs rhum (can be replace by 1 tbs bitter almond fragrance) 


Preheat the oven 200°

To prepare the almond cream: beat 1 egg and 1 egg white with the almond powder, butter and sugar. Keep the egg yolk for later. Add the flour and rhum or fragrance.

Place the puff pastry on a cookie tray and shape it like a cercle by cutting the edges off. Prick the base with a fork, pour the almond cream on it and leave 1 cm on the side. Hide the bean in the cream. Add 1/2 teaspoon of water to the egg yolk and wisk it. Using a brush, go around the edges and spread some of the egg yolk, cover with the second pastry sheet (same shape) and gently press the border with your fingers to seal.

Brush the whole surface on top with the rest f the egg yolk and with a knif draw a pattern. Bake 20 to 25 minutes (golden brown).


Enjoy!
Xx
Préparez la frangipane : battez 1 oeuf entier et un blanc d’oeuf avec la poudre d’amandes, le beurre et le sucre. Conservez le jaune pour dorer la galette. Ajoutez la farine et l’alcool choisi.
2. Déroulez la pâte feuilletée sur une plaque, étalez la frangipane et déposez 1 fève.
3. Couvrez la galette avec la deuxième pâte. Soudez les bords avec un peu d’eau ou de blancs d’oeufs si nécessaire.
4. Badigeonnez le dessus de la galette d’un peu de jaune d’oeuf, à l’aide d’un pinceau. Enfournez 20 à 25 min dans le four préchauffé à 200°C.
5. Servez la galette des rois à la frangipane tiède ou froid.
Read more at http://www.odelices.com/recette/galette-des-rois-a-la-frangipane-r166/#ZBKRjo91ScoO1pYx.99
1. Préparez la frangipane : battez 1 oeuf entier et un blanc d’oeuf avec la poudre d’amandes, le beurre et le sucre. Conservez le jaune pour dorer la galette. Ajoutez la farine et l’alcool choisi.
2. Déroulez la pâte feuilletée sur une plaque, étalez la frangipane et déposez 1 fève.
3. Couvrez la galette avec la deuxième pâte. Soudez les bords avec un peu d’eau ou de blancs d’oeufs si nécessaire.
4. Badigeonnez le dessus de la galette d’un peu de jaune d’oeuf, à l’aide d’un pinceau. Enfournez 20 à 25 min dans le four préchauffé à 200°C.
5. Servez la galette des rois à la frangipane tiède ou froid.
Read more at http://www.odelices.com/recette/galette-des-rois-a-la-frangipane-r166/#ZBKRjo91ScoO1pYx.99

Saturday, November 9, 2013

Baked eggs w/ grilled haloumi, cherry tomato, zuchini and mushrooms

Baked eggs are one of my favorite breakfast food but I love that we can have it for any meal. This is a veggie version of the dish that you can vary by flavouring the simple tomato sauce with whatever you have to hand.


Ingredients
  • 2 eggs
  • 1 tbsp olive oil
  • 1 red onions, chopped
  • 1 red chilli, deseeded and finely chopped
  • 1 garlic clove, sliced
  • small bunch coriander leaves finely chopped
  • 1/2 cup diced haloumi
  • 1/2 cup sliced mushrooms (which ever you prefere)
  • 1/2 cup finely diced zuchini pre cooked)
  • 4 cherry tomatoes
  • 6 tbs of plain tomato sauce
  • 1 tsp caster sugar

 
Preheat the oven 200°

Heat the oil in a frying pan that has a lid, then soften the onions, chilli, garlic and coriander stalks for 5 mins until soft. Stir in the haloumi, mushrooms, zuchini and cherry tomatoes. Add the sugar and put aside.

Pour the mix into two small dishes then crack the egg into each one. Put the dishes in the oven and cook about 10 minutes or until the egg is cook the way you like.

Serve with warm ciabatta, garlic bread or crackers.


Enjoy!

Xx

Tuesday, November 5, 2013

Sweet corn cake

I love going out for breakfast more than dinner because it's not something that we don't have in France and I got addicted to it.
I’ve been looking for a good corn fritter recipe for a while – one that doesn’t produce pancake – like fritters. These are nice and crunchy, and with the lemon and chilli, have a bit of zing to them.
I made a creamy salsa to go with them, it can be switch for tomato salsa, relish, sweet chili sauce, sour cream or guacamole. You can also add bacon!


Ingredients
  • 2 cans of sweet corn
  • 2 birdseye chillies chopped finely
  • 2 shallots chopped
  • handful roughly chopped coriander
  • 2 large eggs
  • 1/2 cup plain flour
  • juice of 1 lemon
  • pinch of salt and pepper
  • olive oil
  • side to serve

Heat a non stick pan with a little olive oil and fry the shallots until just golden.  Drain the sweet corn and mix in a bowl with the shallots and remaining ingredients until combined.

Heat another tablespoon of olive oil in the pan on medium to high.  Drop 2 teaspoons of mixture per fritter into the pan and pan fry on each side until golden brown.  Remove from pan and place on paper towels.

Serve with relish, salsa, sour cream, sweet chili sauce or guacamole to serve.


Enjoy
Xx

Tuesday, October 29, 2013

Stir fry Hookien noodles with chicken and cashew

Lately, I've been feeling like asian food, thai in particular. So after spending a little forture at the thai place near home a couple of times i decided to try my own recipe. So here you go, it's pretty basic so you can add or remove ingredients or swap chicken for pork or duck.


Ingredients 
  • 200g chicken breast fillet cut in chunks
  • 1 handful of snow peas
  • 1/2 cup of cashew
  • 1 red onion, finely chopped
  • 1/2 cup of pinaple chunks (optional)
  • 1 packet of fresh honkkien noodles
  • 2 tbs say sauce
  • 2 tbs fish sauce
  • 1 tbs balsamic vinegar
  • Freshly ground black pepper
  • Sea salt
  • 1 tbs cooking oil (vegetables)
  • 1/2 tsp paprika
  1. Add water in a small sauce pan, bring it to boil and add the snowpeas. Leave it to a gentle simmer for about 10 minutes or until soft. Drain and set aside.
  2. Add water in a medium sauce pan, bring it to boil add the honkkien noodles and cook 2 to 3 minutes or follow the instructions on the packed. Drain and set aside.
  3. Set a wok pan over medium heat, add vegetables oil and onions, cook about 5 minutes. Add the cashew, cook another 3 to 5 minutes or until golden brown. Add the chicken chuncks and lower the heat when it becomes white. Cool another 5 minutes or until the chicken is ready. Add thai sauce, fish sauce, balsamic vingear, salt, pepper and paprika. Season to taste.
  4. Finaly, add the noodles and snowpeas and heat a few minutes, stir occasionaly.
  5. Serve immediatly and add pinaple chunks if desired.

Enjoy!

Friday, October 25, 2013

Chocolate Pear Crumble

The very best thing about crumbles? You don’t really need a recipe for them.
Also? You can use any kind of fruit you have in the kitchen. The ripe and in season and the starting to attract fruit flies. You can toss them all in with each other, mostly. Avoid bananas and watermelon. Otherwise, it’s all fair game.


Ingredients
  • 3 Pears
  • 1 1/2 cup chocolate chips
  • 80g icing sugar
  • 80g brown sugar
  • 1 tbs cinnamon
  • 1/2 lemon juice
  • 200g plain flour
  • 100g rolled oats
  • 75g brown sugar
  • 150g unsalted butter at room temperature
  • Pinch of ground nutmeg
  • Pinch cinnamon
  • 75g almond meal
Preheat the oven 180°

Peel, core and cut into 2cm chuncks the pears.Combine the pears, icing sugar, brown sugar, cinnamon and lemon juice in a large mixing bowl, toss together throughly. Add the chocolate chips and tip into the baking dish.

Combine the crumble ingredients together to get rough crumbs. Scatter evenly over the fruits. Bake 45 minutes or until the fruit is bubling and the crumb is a crunchy golden brown.

Enjoy!

Friday, October 18, 2013

Chocolate fudge brownie

I've been having chocolate cravings lately and when my boyfriend came back from the shops with baking chocolate I could resist! I recently viewed this recipe in a children book: guaranty for a rich in chocolate and easy recipe! Nothing to fancy but just a well balanced recipe and super quick! I did changed the cooking time because I like my brownie softish and 30 minutes would have been too much.

This recipe also suggest a frosting on too. Not being a big fan of frostings I decided to elaborate two versions, one with, one without. So I baked a really thin cake I slices one half and served it like that. The other half were filled with chocolate. I would have say I preferred the plain one but everyone else went back for the frosted one! You try it and let me know :)


Ingredients
250g dark baking chocolate
80g butter
3/4 cup raw sugar
2 large eggs
1 tablespoon vanilla extract
3/4 cup plain flour
1/2 teaspoon salt

Frosting
3 tablespoons butter
3 tablespoons cocoa powder
3 tablespoon Greek yoghurt
1 1/2 tablespoon honey
1 teaspoon vanilla extract
1/2 cup confectioner sugar

Preheat oven 180 degrees.

In a heavy duty sauce pan melt butter and chocolate together, stir often. Once smooth, set aside.

Mix sugar and eggs well until light and fluffy. Then add flour, salt and vanilla extract. Pour the chocolate mixture in the mixing bowl and incorporate all the ingredients together.

Grease the cake pan with butter and flour and tip the batter in the prepared pan. Cook between 15 to 20 minutes depending on how wide your pan is so how spread the mixture is.

To make the frosting, melt the butter in a small sauce pan. Then add cocoa, honey and vanilla. Mix well. Add the confectioner sugar and yoghurt. Beat until it looks like frosting.

Now if you made a thick brownie you can spread the frosting evenly over it and cut it into squares. If like me you made a thin cake, you'd better cutting squares, speed some frosting and cover by another square until you used all the cake.

Enjoy!

Wednesday, October 16, 2013

Chocolate Pistachio mi-cuits with sweet cream

This afternoon I was watching "French Food Safari" that I found at Brisbane library. It already open m appetite, but when they started showing pastries, viennoiseries and other French cakes I had a craving for sweet. I wanted chocolate!
I took a quick look in my pantry and realized that I didn’t have what I use for my usual chocolate cake (no egg or butter). And I remember this clever pin on how to replace egg in a cake. So I built a new recipe that actually turned out really well. Theses cakes are really light and not too sweet. It’s why I made that cream that goes perfectly with it and balances the sweets!


Chocolate Pistachio cake
  • 1/2 cup brown sugar
  • 1 cup caster sugar
  • 2 1/2 cups of flour
  • 1 cup butter
  • 1 1/2 cup yogurt
  • 2 cups milk
  • 1 cup cocoa powder
  • 3/4 cup finely slices pistachio + 1/4 for decoration

Sweet cream
  • 1 cup pouring cream
  • 1/2 cup sugar
  • 1tbs lemon juice


Mix all the dry elements together in a large bowl (exepted for the pistachios). In a second mixing bowl mix the melted butter, yogurt and milk. Slowly start pouring the liquids into the first bowl.
Preheat oven 180°
Place the mixture in small cake pan (make about 12, depending on the size). Add the pistachios on top. Cook 20 to 25 minutes.
Let the cakes cool down. In a bowl, incorporate the pouring cream, sugar and lemon juice untill you obtain a bubly and smooth texture. Then, disposate the warm cake on a plate with the cream and decorate with pictachios and cocoa powder.

Enjoy!
Xx

Saturday, August 31, 2013

Come back & best muffin recipe

Well after a good 2 months away from you I finally found the courage to start writting again! I've been away then too busy to cook anything interesting and I ended up feeling awefull for waiting that long and was shy to write a new post.

When I went in Queensland, I stopped by the little village of Kuranda which is a huge hyppie market with lots of organic and hand made products. After a tiring morning wondering around the aisles I stopped for a muffin-coffee and that was.... I had to ask what was his secret and he did gave me the recipe.

Too happy i tried it, first thing when I came back in Sydney. Not disappointing at all! They are soft and full of taste. Really easy to make and you can use the base of this recipe for any flavour just add whatever you feel like. It is the perfect perfect balance for a good muffin base.

Here are some pictures of the trip in North Queensland and the muffin's recipe.


Ingredients
  • 300g flour
  • 150g brown sugar
  • 50g melted butter
  • 1 egg
  • 225ml milk
  • 2 bananas
  • 2 teaspoons of honey (can be replace by 60m of butter scotch)
  • 1 handfull of dark chocolate
  • 1 handfull of white chocolate (can be replace by macadamia)


  1. Preheat oven at 200°
  2. Mix all the dry ingredients together and keep on the side.
  3. Mix well the egg with melted butter and add milk and honey. Slowly poor the dry mix into this one. Stir until everything is well combine then add the chocolates and bananas.
  4. Poor into muffins pan and cook at 200° for 20 minutes.


Have a good week end

Xx

Friday, June 14, 2013

Stuffed Rigatoni Pasta Bake


This is a perfect weeknight dinner. Because you can assemble it early in the day and stick it the fridge as is in the baking pan, and then baked it right before dinner.
I like to serve a vegetarian dinner and explore new recipe without meat. I think the ricotta cheese really pumps up the flavor, and I love any pasta in tomato sauce…For this recipe you could think of using a mix of ricotta and goat cheese or only goat cheese!

I am taking rigatoni pasta and stuffing it with a mixture of ricotta, then I take those cute little stuffed pasta and let them bath into tomato sauce. Then I sprinkle with mozzarella and let it bake for 15-20 minutes.


Ingredients
  • 1 pack rigatoni pasta
  • 1  ricotta cheese
  • Salt & pepper
  • 3 cups tomato pasta sauce (or good quality store bought napolitana)
  • 1 handful fresh basil leaves
  • ½ cup grated cheese
  • 2 pinch of italian herbs
 
 
Methode
  1. Preheat the oven 180°
  2. Bring a large pot of salted water to boil? Add the rigatoni and cook 5 minutes: al dente. Drain them. 
  3. In a bowl combine ricotta, salt, pepper and italian herbs.
  4. Put the cheese mixture in a pastry bag and snip the end off. Pipe the room temperature cheese into the rigatoni noodles. If you don't have pastry bag you could stuff them with a knif but it might take a while. TIP: make sure the ricotta is at room temperature so it's easy to pipe.
  5. Stand the stuffed rigatoni in a baking pan.   
  6. In a sauce pan, heat up you tomato pasta sauce and add the basil leaves. Pour it on top of the rigatoni and add the grated cheese.
  7. Bake for 15 minutes or until the cheese melt.

Ingredients

  • -1lb rigatoni pasta
  • -8 ounces ricotta cheese
  • -4 ounces goat cheese
  • -Kosher salt
  • -Fresh black pepper
  • -3 cups marinara (or good quality store bought marinara)
  • -1 handful fresh basil leaves
  • -½ cup finely grated parmesan cheese
- See more at: http://www.heatherchristo.com/cooks/2013/02/17/skillet-baked-stuffed-rigatoni/#sthash.iiVbsbOg.dpuf


Enjoy!
Xx
Then sprinkled them with parmesan. Then I baked them up until they were a little crispy around the edges. - See more at: http://www.heatherchristo.com/cooks/2013/02/17/skillet-baked-stuffed-rigatoni/#sthash.iiVbsbOg.dpufThen
I am taking rigatoni pasta and stuffing it with a mixture of ricotta and goat cheese. Then I take those cute little stuffed noodles and made them bathe in tomato sauce. - See more at: http://www.heatherchristo.com/cooks/2013/02/17/skillet-baked-stuffed-rigatoni/#sthash.iiVbsbOg.dpuf
I am taking rigatoni pasta and stuffing it with a mixture of ricotta and goat cheese. Then I take those cute little stuffed noodles and made them bathe in tomato sauce. - See more at: http://www.heatherchristo.com/cooks/2013/02/17/skillet-baked-stuffed-rigatoni/#sthash.iiVbsbOg.dpufI
I am taking rigatoni pasta and stuffing it with a mixture of ricotta and goat cheese. Then I take those cute little stuffed noodles and made them bathe in tomato sauce. - See more at: http://www.heatherchristo.com/cooks/2013/02/17/skillet-baked-stuffed-rigatoni/#sthash.iiVbsbOg.dpuf

Sunday, June 9, 2013

DIY cercle Paper Garland & Opening of the ETSY shop

Yay! It's a long week end! These 3 days off because of the Queen's birthday will be really well used. In a word, craft, craft, Craft.
I wish to advise you of the oppening of my Etsy shop where I started to list my last creations. How exiting?! Sharing my creations with you on the blog is one thing, but being able to sell them all over the world is at the next level. Now let's see if people like it.


This garland would be perfect for a baby shower, new born bedroom or even a weding decoration.

Material
  • Thin brown rope
  • Large papers (all of them white or very close to white)
  • Hole punch
  • Craft glue
 Direction
  1. Cut 1.5m of rope (or just cut the size that you wish to make your garland).
  2. Using the hole punch make 30 circles
  3. Glue 2 circles to each other with the rope going inbetween them, and start over and over untill you use every circle or untill the size pleases you. Leave about 2 centimeter between each circle.
Feel free to go have a look at the Etsy shop and let me know what you think :)

Have a good week end

Xx

Monday, June 3, 2013

Carnival party theme - Printable

I am turning 20th in a month and in France it's a really important birthday: when you move from youre chilhood to the 'adult world'. Personaly I felt that when I moved to Australia and had to start taking real responsabilities and decisions. But I found there an oportunity to throw a childish-sofisticated party... Carnival theme it will be!

It will be colorful, sweet treat, pinata, photo booth... Where is the sofisticated part? My guest list: adults only. We live in a 2 bedroom apartment with a good size living room but not big enough to suport kid's noize! I am taking care of everything myself, I just haven't decide for the cake, it has to be phenomenal: large, high, colorful and a little crazy. I am may be thinking of ordering it but I still have to pick one!

Here find the pictures of the labels the food/drinks on the table and birthday invitation. If you want to get them, go directly to my Esty store


Have a beautiful week end!

Xx

Sunday, June 2, 2013

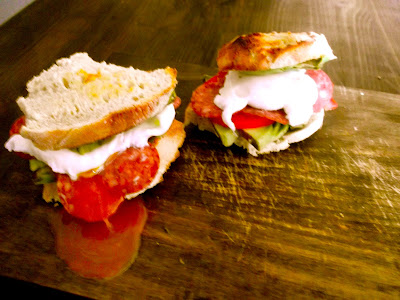
Breakfast Sandwich - Pepperoni, Avocado, Tomato & Poached Eggs

I seriously needed big breakfast this morning. Either I didn’t eat enough yesterday or I must have worked harder than I realized last night because I woke up this morning absolutely STARVING. I needed something really hearty, but I also wanted some vegetables and bread and I needed to get it in my stomach FAST. Breakfast sandwich time!

I recently discovered this new bakery that has this beatifull sourdough bread and at home we can't live without it. I started to rediscover this simple but delicious bread with everything.

The first bite was like nothing I had ever had before. I was totally transported in the breakfast for dinner kind of ecstasy. I mean, I’ve had breakfast sandwiches before, but there was something about putting all these ingredients inside some amazing sourdoughbread.


Ingredients
  • 4 slices of sourdough bread
  • 2 poached eggs
  • Few slices of peperroni (can also use fried bacon)
  • 1/2 soft avocado
  • 1 tomato

Methode
  1. Start boiling water for the eggs while putting the bread in the toaster.
  2. Spread avocado on the bread add tomato slices and peperroni.
  3. Poached the eggs and add them on the sandwich then close it. Too easy!

Enjoy
Xx

Sunday, May 12, 2013

Peaches pie pop stick

These cute peaches pie pop stick are too cute. Just look so good on a sweet table!
Lemon juice adds a nice tang but also keeps peaches from turning dark. Frozen peaches can be used if they are first thawed and well drained.


Ingredients


  • 2 Puff pastries
  • 6 cups diced peeled fresh peaches
  • 1 tablespoon lemon juice
  • 1/2 teaspoon almond extract
  • 1 cup sugar
  • 1/4 teaspoon salt
  • 2 tablespoons butter

Directions
  1. Turn the oven on: 150°
  2. In a large bowl, combine the peaches, lemon juice and extract. Add sugar and salt; toss gently. Let stand for 15 minutes. Drain extra juice before using the peaches.
  3. Line the 2 sheets op pastry on a table. With a glass cut as many cercles as you can.
  4. Place de pastry cercle into  cookies tray and fill with the mix (not too much because you need to be able to close it) dot with butter. Cover up with another pastry cercle and close it helped with a fork.
  5. Cover loosely with foil and bake for 10minutes. Then remove the foil and bake for 4 to 10 minutes longer or until crust is golden brown. Cool on a wire rack.


Wednesday, April 24, 2013

Mustache Cake

I saw this cake on Pinterest last Movember November and since the I so wanted to try it. First I thought that April is not the best time to make it but then I realized, you use any occasion. You just never ever know when a mustache cake might come in handy.  I think it could be used really at any occasion because it’s really hysterical and people laugh when they see one and when people laugh they are happy and who doesn’t love a happy party?!

It is actually less complicated than its look. All you need to do is a mud cake (any flavor) in a circle cake pan and then cut a 'yin & yang' shape. Don't worry, it's easy! Then cover it and make it looks like hair on the top.


Ingredients
  • Your favorite mud cake recipe.
  • 200g dark baking chocolate
  • 2 tbs butter
  • 2 tbs icing sugar

Directions
  1. Bake the mud cake and let it cool down
  2. Level the top of the cake to make it eaven. Take it out and cut the cake in a YING YANG shape.  First make a small cut with a paring knife. When you get your ying yang just right then take a very sharp knife (not a bread knife) and cut it to the bottom of the cake.
  3. Then, do not do like me, do the covering on a cookie tray and then move the cake into it's show board. I did  not planed on bringing this cake somewhere, it was just a try at home!
  4. We are now getting to icing. If you have a crumb brush it’s a great idea to run that over the crumb parts of the cake so when you are icing you don’t get all clumped up. Melt the baking chocolate with the butter and then add the icing sugar. Like I always tell you, you can add more icing sugar, get it with the consistncy that You like.
  5. Apply the icing with an icing tool or a butter knife and at the end draw thin stripes on the top to make it looks like hairs. VOILA! Mustache cake!

Sunday, April 21, 2013

Double chocolate pear tart

This recipe is a keeper! Tart, pear and chocolate, what else to make a perfect desert? It is delicious and so easy to make.

 I love that you can make it anytime in the year, first because pears are available all over the year and second, you can still use can fruits in this one, it will still be good. Another thing is that you can make it in a big tart pan for the hole family or as individual deserts. You could make it without the almond extract, but it does really add the right touch. It is as well possible to add sliced almonds or to make it with apples.


 Ingredients

  • 8 tablespoons (1 stick) unsalted butter, room temperature, plus more for pan
  • 3/4 cup sugar
  • 3 large eggs
  • 1/3 cup unsweetened cocoa powder
  • 1 teaspoon pure vanilla extract
  • 1/2 teaspoon salt
  • 1/4 teaspoon almond extract (optional)
  •  2 firm, ripe pears

 Directions
  1. Preheat oven to 350 degrees. Brush a tart pan with butter, set aside.
  2. In a mixing bowl, combine sugar and cocoa powder. Add butter (melted or just soft, the easiest way for you), eggs, vanilla, salt, and almond extract, until combined. Spread mixture evenly in prepared pan.
  3. Peel, halve, and core pears; cut lengthwise into thin slices, (rubbing them with lemon as you work to prevent discoloration). Arrange slices on chocolate mixture, slightly overlapping, without pressing in.
  4. Place pan on a baking sheet; bake until top is puffed and a toothpick inserted in center of chocolate mixture comes out with only a few moist crumbs attached, 45 to 50 minutes. Cool completely in pan.
  5. Let set, at least 20 minutes. Remove tart from pan, and serve.


Saturday, April 20, 2013

My favorite of all

I've been talking about myself, baking, cooking or DIY but never about where do I get my inspiration. Here is a list of my Top 10 cooking blog. Trust me you  will find something you love in each of them!

When I decide to start following a new blog it is because first I like their pictures. I am obsessed about great food pictures and ameliorate my shooting skills. I also look at the kind of food, if the recipe are likely to work, the general ingredients use, if there is enough baking recipe, a little of junk food... I am very fancy to select a blog so it is maybe a good thing there is so many!

I will give you more links soon because 10 is definitely not enough, there is so many great cooking blogs.

chocolate-hazelnut macaroon torte
the smitten kitchen


  1. Smitten Kitchen
  2. Love from the oven
  3. Sally's baking addiction
  4. What should I eat for breakfast today
  5. Table for two
  6. Sprouted Kitchen
  7. Sips and Spoonfuls
  8. Hungry rabbit
  9. Daisy's world
  10. Chef in training

Happy reading!

Saturday, April 6, 2013

Cookies Cups

Lately I've decided that I am not affraid of using my hands to mix dough. Because I don't have electric mixer, that opened many possibilities! So here I am making pizza dough, cookies, crumbles... I've been wanted to try more cookies recipe for a long time now, but I am only starting now. Every time I make cookies they come out the oven in terrible shapes!

So I tryed this basic 'choc chips' one one my cookie tray. I used only half of the dough. They came out good looking but that wasn't the taste that I am looking for. I remembered this pin saying to put the muffin pan upside down and place the cookie dough on it. Guess what? It's working very well! Those little cups/ baskets are so cute and you can use them in so many ways: ice cream, fruit salad, whipped cream, decoration....

I've tried it with the chocolate ice cream from Cadbury: that was delicious! You can also add more ingredients in the dough, like macadamia nuts, coco powder...


 Ingredients
  • 2 Eggs
  • 250g butter at room temperature (Salted butter can be used)
  • 200g Raw or white sugar (Raw is better)
  • 480g flour
  • 1 pinch of salt if you are using unsalted butter
  • 1 tbs of baking powder
  • Vanilla extract
  • Chocolate chips (150 to 200g)

Directions
1.Turn the oven on: 190° fan
2.Mix butter and sugar, on low or with your hands until there is no more pieces of butter. Be carreful, it's very fat!
3.Add eggs and vanilla. Mix properly. Then salt and baking powder.
4.Start to add the flour slowly. At the end it's become easier to use your hands.
5.Add the chocolate chips and everything you want: macadamia nuts...
6.At this stage it's good to keep the dough as a ball in the fridge for half an hour.
7.Turn your muffin pan up side down and display the cookie dough every two spaces. Do not go all the way down, the cookie dough melt a lot and use 1/4 to 1/3 of a handful of dough for each cup.
8.Cook 8 to 10 minutes. Let it cool down and store it in the fridge or you can freez it.

I also used this dough to make cookies
Enjoy!